Controller
You can select the user interface, 'Standard' or 'Slider'. See Settings (Preferences).
You can show/hide the Controller by choosing View Menu > Show/Hide Controler Menu.

'Slider' interface
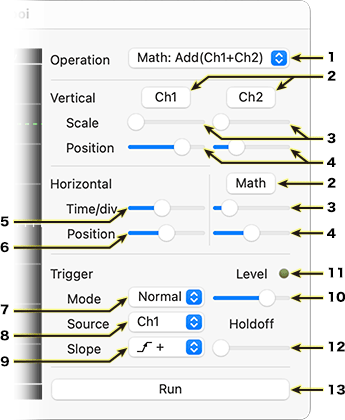
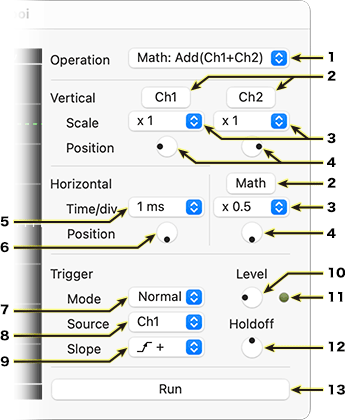
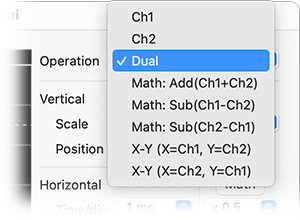
- Operation Menu
- 'Ch1' - Displays the channel 1 signal.
- 'Ch2' - Displays the channel 2 signal.
- 'Dual' - Displays the channel 1 and channel 2 signal.
- 'Math: Add(Ch1+Ch2)' - Displays the channel 1, 2 and Math Operation (Add: Ch1+Ch2).
- 'Math: Sub(Ch1-Ch2)' - Displays the channel 1, 2 and Math Operation (Subtract: Ch1-Ch2).
- 'Math: Sub(Ch2-Ch1)' - Displays the channel 1, 2 and Math Operation (Subtract: Ch2-Ch1).
- 'X-Y (X=Ch1, Y=Ch2)' - X-Y mode. Channel 1 becomes the X-axis input and channel 2 becomes the Y-axis input.
- 'X-Y (X=Ch2, Y=Ch1)' - X-Y mode. Channel 2 becomes the X-axis input and channel 1 becomes the Y-axis input.
- Channel Number Button (Invert Button) - Press this button to invert the positive and negative signs of the waveform.
- Vertical Scale Slider (V scale)
- Vertical Position Controller (V position)
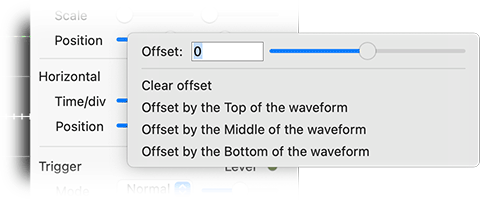
- Right-clicking on the 'V Position controller' brings up the 'Ofset' menu. By operating 'Offset', you can shift the display position of the waveform.
- Time Base Menu - Select the time base: 10μs - 0.5s.
- Horizontal Position Controller (H position)
- Trigger Mode Menu
- 'Normal' - Normal trigger mode.
- 'Auto' - Auto trigger mode.
- 'Single' - Single trigger mode.
- Trigger Source Menu
- Trigger Slope Menu
- Trigger Level Controller
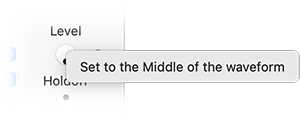
- Right-clicking on 'Trigger Level Controller' brings up a menu with the item 'Set to the Middle of the waveform'. Selecting that term sets the trigger level to the middle of the current waveform.
- Trigger Indicater - It lights like a green LED when trigger occurs.
- Holdoff Controller - Adjust hold off period (unit: div). How to convert 'div' into time: If 'Holdoff'
= 1.3div and 'Time Base' = 1ms/div, then time = 1ms/div x 1.3div = 1.3ms.
- 'Run' Button - Press 'Run' button to start waveform acquisition. 'Run' button changes 'Stop' button.
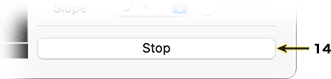
- 'Stop' Button - Press 'Stop' button to stop waveform acquisition. 'Stop' button changes 'Run' button.
To push the space key or double-click on the Display area carries out the same function as the Run/Stop button.
 You can choose the desired action by pressing modifier keys while dragging the linear slider. The sliders in the Settings (Preferences) dialog behave similarly.
| Modifier key |
Action |
| shift |
V Scale: stepwise at 0.5
other: 8 steps |
| option |
10 steps |
| option + shift |
20 steps
|
| command |
fine adjustment |
| command + shift |
ultra fine adjustment |
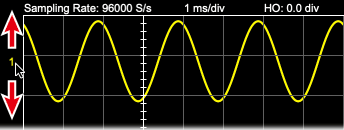
Display area
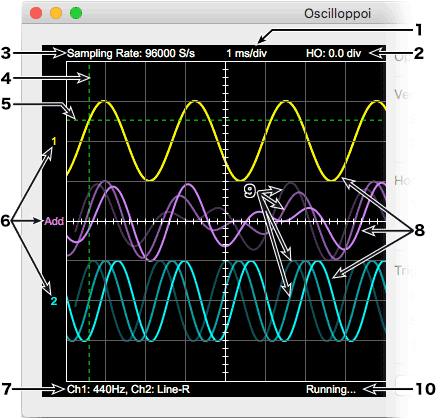
- Time Base
- Holdoff (HO)
- Sampling Rate
- Trigger Point
- Trigger Level
- Channel
- Signal Source - If you choose internal signal - "Sine Wave", frequency is displayed.
- Waveform
- Afterimage - Previous waveform.
- 'Running' - When Oscilloppoi is running, 'Running...' is displayed and dots flash on and off.
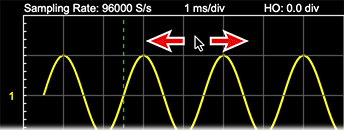 The waveform display area is draggable.
 The numbers of channel are draggable.
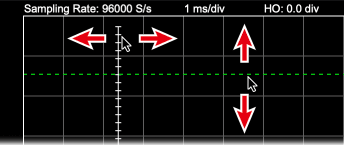 The center lines (vertical and horizontal) and the trigger level line are draggable.
You can choose the desired action by pressing modifier keys while dragging the Display area.
| Modifier key |
Action |
| shift |
8 steps |
| option |
10 steps |
| option + shift |
20 steps |